
开始一个工程,最快速的方法就是使用代码自动生成工具生成基础代码。俗话说,好的开端是成功的一半。熟悉一款代码自动生成框架则是项目成功的开始,呵呵!本文主要介绍代码自动生成框架——MyBatis Generator的配置文件,并且强调需要注意的地方,相对于网上千篇一律的配置介绍,这些强调的地方就是本文亮点,读者请注意阅读。
配置文件示例
<?xml version="1.0" encoding="UTF-8"?>

<!DOCTYPE generatorConfiguration PUBLIC
    "-//mybatis.org//DTD MyBatis Generator Configuration 1.0//EN"
    "http://mybatis.org/dtd/mybatis-generator-config_1_0.dtd">

<generatorConfiguration>
<!-- classPathEntry:数据库的JDBC驱动的jar包地址 -->
<classPathEntry location="E:\repository\mysql\mysql-connector-java\5.1.9\mysql-connector-java-5.1.9.jar"/>

<context id="DB2Tables" targetRuntime="MyBatis3">
    <commentGenerator>
        <!-- 是否去除自动生成的注释 true:是; false:否 -->
        <property name="suppressAllComments" value="true"/>
        <property name="suppressDate" value="true"/>
    </commentGenerator>

    <!--数据库连接的信息:驱动类、连接地址、用户名、密码 -->
    <jdbcConnection driverClass="com.mysql.jdbc.Driver" connectionURL="jdbc:mysql://localhost:3306/test"
                    userId="root" password="123456">
    </jdbcConnection>

    <!--  默认false,把JDBC DECIMAL 和 NUMERIC 类型解析为 Integer
             true,把JDBC DECIMAL 和 NUMERIC 类型解析为java.math.BigDecimal
         -->
    <javaTypeResolver>
        <property name="forceBigDecimals" value="false"/>
    </javaTypeResolver>

    <javaModelGenerator targetPackage="com.sean.model" targetProject="E:\gitwork\code-generator\src\main\java">
        <!-- enableSubPackages:是否让schema作为包的后缀 -->
        <property name="enableSubPackages" value="false"/>
        <!-- 从数据库返回的值被清理前后的空格  -->
        <property name="trimStrings" value="true"/>
    </javaModelGenerator>

    <sqlMapGenerator targetPackage="sqlmap" targetProject="E:\gitwork\code-generator\src\main\resources">
        <property name="enableSubPackages" value="false"/>
    </sqlMapGenerator>

    <javaClientGenerator type="XMLMAPPER" targetPackage="com.sean.mapper" targetProject="E:\gitwork\code-generator\src\main\java">
        <property name="enableSubPackages" value="false"/>
    </javaClientGenerator>

    <table tableName="user" domainObjectName="User" enableCountByExample="false"
           enableUpdateByExample="false" enableDeleteByExample="false" enableSelectByExample="false"
           selectByExampleQueryId="false"/>
</context>
配置文件说明
- classPathEntry: 指定代码自动生成过程中需要的依赖包或者其所在的路径。
- context: 该元素的属性
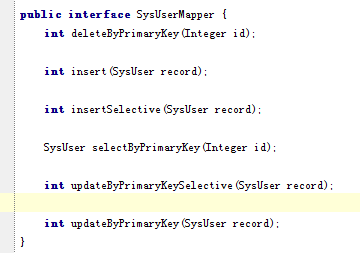
targetRuntime指定生成的代码的运行时目标。该属性值有MyBatis3、MyBatis3Simple、Ibatis2Java2和Ibatis2Java5。MyBatis3模式默认生成的对象将包含很多"by Example"的方法,如果不想生成这些,可以在后续的table元素中配置取消;MyBatis3Simple模式默认每个表生成一个实体对象,生成的Mapper接口仅包含必须的5个方法:deleteByPrimaryKey、insert、selectByPrimaryKey、selectAll、updateByPrimaryKey。下面发两张图,分别表示MyBatis3模式生成的Mapper对象和MyBatis3Simple模式生成的Mapper对象。

commentGenerator:
该元素不能和后面的jdbcConnection元素交换位置,注释设置必须context其他子元素之前,否则配置文件报错。table:该元素的
*ByExample属性,默认是true,即默认生成"by Example"的许多方法。在说明context元素的时候提到如何禁止这些方法的生成,在此,将所有的*ByExample属性值设置为false。
其他属性这里不赘述,因为网上很多文章都讲解到了,也可以根据配置示例中的注释得知其意义,或者可以参考官方说明。回头看下context的targetRuntime属性,作为读者,你会采用MyBatis3(网上文章通常使用)还是MyBatis3Simple来生成代码呢?